Monday, December 17, 2012

Healthy Holiday Sides - Green Beans

 
Green beans seem to be a perennial favorite for the holiday table.  And that's a good thing.  If you are looking for an easy to prepare and healthy green bean recipe, this recipe may be an option.  Before you get too caught up in the healthy part, it does have two slices of bacon.  It serves 6, so that's of a slice per person.  It is the holidays and a little bacon during the holidays is okay.

Bacony Green Bean Salad

Serves 6.

Ingredients:

1½ pounds green beans, trimmed
2 slices bacon, diced
cup minced shallots
¼ teaspoon salt
1 Tablespoon extra virgin olive oil, optional
Juice of one lemon

Directions:

1.  Bring a large saucepan of salted water to a boil.  Add green beans and cook until crisp-tender, about 3 minutes.  Drain.  Rinse with cold water and drain well.  Pat dry.  (Can be prepared 1 day ahead.  Refrigerate until ready to finish cooking.)

2.  Cook bacon in a large skillet over medium heat until crisp.  Transfer to paper towels.  Pour off all but about 1 tablespoon of fat.  Add shallots to skillet and cook for about 2 minutes, stirring often.

3.  Add green beans; sprinkle beans with salt.  Stir to coat.  Add olive oil, if desired and lemon juice.  Stir until beans are heated through.  Place in a serving bowl and top with bacon.

Tuesday, November 27, 2012

Healthy Holiday Sides - Wheatberry Salad

I first tasted wheat berry salad at a local foods luncheon.  I loved it so much that I purchased a bag of wheat berries without even knowing how to make the salad. 

I still don't have a 'real' recipe for wheat berry salad.  I have come to think of this salad the same way  I do a lettuce salad.  The wheat berries serve as a base, like lettuce.  I build the salad from there.  Wheat berries tend to be very chewy.  So I add something crunchy like nuts.  I also like dried cranberries for more texture and color.  Unpeeled apples add more flavor and a little moisture.  Depending on the time of year, you can mix and match your ingredients.

Here is my version of wheat berry salad.

Wheat Berry Salad

Serves 6 to 8.

Ingredients:
1 cup wheat berries
3 cups water
1 teaspoon salt
cup orange juice
cup dried cranberries
1 large apple, unpeeled and diced
½ cup walnuts or pecans, toasted
3 Tablespoons red wine vinegar
3 Tablespoons extra virgin olive oil
¼ teaspoon salt
¼ teaspoon black pepper

Directions:
1.  Sort through wheat berries and discard any stones.  Rinse well under cool running water.  Place in a medium sauce pan.  Add water and salt.  Cover and bring to a boil. 

2. Reduce heat and simmer for about 1 hour, stirring occasionally.  Drain. 

3.  Combine orange juice and dried cranberries in a small bowl.  Let stand for 15 minutes.

4.  Combine wheat berries, apple and nuts in a large bowl; stir gently.  Drain the cranberries, reserving the juice.  And cranberries to wheat berry mixture.

5.  Whisk together the orange juice, vinegar and oil in a small bowl until combined.  Season with salt and pepper.  Pour over salad and stir gently to coat.  Refrigerate for at least 30 minutes.  Serve cold or at room temperature.

Tuesday, November 20, 2012

Sweet Potatoes for the Holidays

If your family is like mine, it is a must to have sweet potatoes on the holiday table.  I must also say that our sweet potato dish starts with a stick of butter and is topped off with a cup (minimum) of sugar.  Now you see why my family does not purchase bathroom scales.  We will still make candied yams this year.  If we didn't, we would be cast out of the family. 

While I am willing to provide the traditional family favorites, I am also going to add a few healthier options.  After all, those concerned with their caloric intake should also have options.  And if the others like, we'll share.

Sweet Potato Gratin

Serves 6 to 8.

Ingredients:
3 pounds sweet potatoes
6 Tablespoons butter, divided
¼ cup, plus 2 Tablespoons packed light brown sugar, divided
2 eggs
cup orange juice
2 teaspoon cinnamon, divided
½ teaspoon salt
¼ teaspoon nutmeg
cup all purpose flour
¼ cup old fashioned or quick oats (not instant)
cup chopped walnuts or pecans

Directions:
1.  Preheat oven to 350°F.  Pierce sweet potatoes in several place with a knife or fork.  Place on a rimmed baking sheet and bake until tender, about 1 hour.  Alternately, sweet potatoes can be cooked in a microwave.

2.  While sweet potatoes are still hot, remove the peel and place potatoes in a large bowl.  Beat in 2 tablespoons butter and 2 tablespoons brown sugar.  Add eggs, orange juice, 1½ teaspoons cinnamon, salt and nutmeg.  Beat until smooth.  Pour mixture into a 1½ quart baking dish.  Smooth the top.

3.  Topping.  Combine flour, oats, remaining ¼ cup sugar and ½ teaspoon cinnamon in a medium bowl.  Cut in the remaining ¼ cup butter with pastry blender or 2 knives until mixture resembles coarse crumbs.  Stir in pecans.  Sprinkle topping evenly over sweet potatoes.  At the point, the dish can be covered and refrigerated for up to one day.  Let stand at room temperature one hour before baking. 

4.  Preheat oven to 350°F.  Bake the gratin for 25 to 30 minutes or until sweet potatoes are heated through.  For a crisper topping, broil 5 inches from heat source for 2 to 3 minutes or until golden brown.

Wednesday, November 14, 2012

Healthy Holiday Sides - Brussels Sprouts

 
First of all, I'm not sure if anyone eats Brussels sprouts at Christmas and Thanksgiving.  However, food magazines seem to think that we all eat Brussels sprouts during the holidays.  I am actually quite fond of Brussels sprouts. But after testing a few Brussels sprouts recipes for this blog, I don't want them for the holidays.  If you haven't had your fill of Brussels sprouts yet, give them a try during the holidays. 

Brussels sprouts belong to the cruciferous family of vegetables.  Other members of the cruciferous family include collards, kale, turnip, broccoli, and kohlrabi.  These vegetables tend to be slightly bitter.  You may have to try a few preparation methods before you convince your children to try them. 

Recently, scientists have been touting the benefits of cruciferous vegetables.  These vegetables contain a compound called isothiocyanates which may help prevent certain forms of cancer.  And that is good news.  So this holiday season make sure there is at least one cruciferous vegetable on the table.

I found this recipe for Not Your Mama's Brussels Sprouts in the book, A New Turn in the South, by Hugh Acheson.  I really like the book.  For a Southern girl, turned sorta Midwesterner, that's a compliment.  The Brussels sprouts are parboiled for about 1 to 2 minutes and then dipped in cold water.  They are then briefly sautéed in butter and olive oil.  If you want a little extra zip, add red pepper flakes.

Not Your Mama's Brussels Sprouts

Serves 6.

Ingredients:

1 pound Brussels sprouts
1 teaspoon Kosher salt, divided
½ Tablespoon olive oil
1 Tablespoon butter
1 Tablespoon red wine vinegar
½ teaspoon red pepper flakes, optional

Directions:

1.  Wash Brussels sprouts and slice off about ¼-inch on the stem end (It's dirty).  Slice Brussels sprouts in about ¼-inch slices.  Set aside.

2.  Bring 2 quarts of water to boil over high heat.  Add ¾ teaspoon salt.  Add Brussels sprouts and cook for about 2 minutes.  Remove and immediately dump into ice bath.  Drain water.

3.  In a 12-inch skillet heat the olive oil and butter until it is almost smoking.  Add Brussel sprouts and sauté for about 3 to 4 minutes.  Add the remaining ¼ teaspoon salt and vinegar.  Serve immediately.

Wednesday, November 7, 2012

Healthy Holiday Sides

This is my second year of doing healthy holiday side dishes.  It's been fun doing these dishes to help you keep your holiday table a little healthier.  Most of these dishes are simple and easy to prepare.  After all, it's the holidays and something in your life should be simple. 

Since you don't have a lot of time, I'll get right to the recipe.

Braised Winter Squash

Serves 4 to 6.

Ingredients:

2 pounds winter squash, peeled and cubed
2 Tablespoons butter
1 teaspoon rosemary or sage, optional
1 teaspoon salt
2 cups apple cider or apple juice
Freshly ground black pepper, to taste

Directions:

1.  Melt butter in a large saucepan.  Add rosemary or sage and cook until fragrant, 1 to 2 minutes.

2.  Add apple cider, salt and black pepper.  Bring to a simmer.

3.  Add squash.  Cover and cook until tender, about 20 minutes, stirring occasionally.  At this point, the squash should have a glazed appearance.  If not, remove the lid and continue to cook for a few minutes.

This recipe will work with any type of winter squash or sweet potatoes.  Winter squash include butternut, acorn, sweet dumpling, and delicata.  Check with your supermarket or farmer's market for selections available in your area.


Tuesday, October 16, 2012

It's All About the Pears!

One of the things that I like about fall is the arrival of pears.  There are over 3,000 varieties of pears grown around the world, but only a few are available in the United States.  Pears are widely available in the fall and winter.  When selecting pears, gently press your thumb at the neck to test for ripeness.  The more the pear gives, the riper it is.  Store pears at room temperature until they reach desired ripeness.  They should be refrigerated to avoid over-ripening.  For more information and fun pear facts, take a look at USA Pears

For years, I only thought of pears as a snack to be eaten right out of hand.  And there is nothing wrong with that.  Recently, I have begun to think of pears as more than a snack.  And why not?  It's a fruit just like apples. Pears can be used in numerous ways, to make pear sauce - think applesauce.  They can be made into pies and tarts.  They are also wonderful roasted or simmered in honey.  For more pear recipes, check out Saveur magazine website.

One of my favorite ways to cook pears is stovetop in honey and a bay leaf.  I serve this with Greek yogurt, but ice cream would be a good accompaniment.

Pears with Honey, Bay and Greek Yogurt

Serves 6.

Ingredients:
cup sliced almonds or pistachios
3 firm Bosc pears
cup honey
3 bay leaves
2 Tablespoons amaretto, optional
1½ cups Greek yogurt

Directions:
1.  Preheat oven to 375°F.  Place nuts on a rimmed baking sheet and toast in the oven until fragrant and lightly browned, about 5 minutes.  Pour onto plate and cool.  (This can be done a head of time.)

2.  Halve the pears, lengthwise.  Cut out the fibrous sections connecting the stems to the cores.  Using a melon baller or paring knife, scoop out the cores.

3.  In a large skillet over low heat, combine honey and bay leaves.  Bring to a simmer.  Continue to cook until honey bubbles.  Remove from heat.

4.  Carefully place pear halves, cut side down, in skillet.  Cover and continue to cook for about 10 minutes.  Using a long handled spoon, gently turn the pears over and baste with the honey mixture.  Drizzle amaretto, if using, into the honey mixture.  Continue to cook, uncovered, until pears are golden brown and a paring knife slips easily into the centers, about 6 to 8 minutes. 

5.  In a bowl, stir the yogurt until smooth.  To serve, place each pear half in a bowl, dollop with the yogurt and sprinkle with nuts.  Dizzle with the honey mixture and serve.


Wednesday, September 26, 2012

50 Ideas for Breakfast on the Fly


I'm finally back into the swing of school and classes and most of the other things that go along with rising a little earlier.  Even though I need to be out of the house a little earlier, I also like to have breakfast before I leave for work.  Most likely due to years of my mother, "Now, you know breakfast is the most important meal of the day.  You can't learn on an empty stomach".  I'm sure you heard it too.  While I want breakfast, I also need it to be quick and hand-held is a good idea.  It doesn't have to be pretty, just nutritious and quick.

I realize smoothies are the 'in thing' and I do like them.  But in the morning, I'm just not 'with it' enough to handle motorized moving parts, aka, a blender. 

While meandering through the web, I found this idea on food network. It was titled 50 Breakfast on the Fly.  My first thought was that old song, 50 Ways to Leave Your Lover.  Okay, back to food.  I thought it was an excellent idea.  Most of the ideas are pretty basic and made with common ingredients.  Just quick and easy ideas to help you eat breakfast. 

I picked #13, Breakfast Egg Salad Sandwich.  Here are the ingredients.  One hard boiled egg, 1 tablespoon mayonnaise and 1 teaspoon Dijon mustard (or whatever is in the frig).  Chop the egg, add mayonnaise and mustard.  Mix thoroughly.  This can all be done the night before, meaning an extra 5 minutes of sleep.  For mine, I also added about of an avocado and a dash of hot sauce. 


Monday, September 17, 2012

Eggplants and Tomatoes

Summer is almost over and I have not posted anything on eggplants.  Well, you know I just can't let that happen.  After all, eggplants will soon be out of season and I don't feel that you should wait a whole year to eat eggplant.

Eggplant is one of my favorite vegetables.  Until recently, the globe eggplant was the primary one available in the United States.  Now we have a wider variety, such as, Japanese, Thai and Rosa Bianca.  For more unusual varieties, check out your local farmers market

While eggplant Parmesan is an excellent dish, there are numerous ways to use eggplants.  The nice thing about eggplants is that they don't have a lot of flavor, therefore, they are able to blend in with other ingredients, such as tomatoes and zucchini. They can be sautéed and used on pizza, in lasagna, and in sandwiches. Eggplant is a component of the Greek dish, briam and the French dish, ratatouille

For this recipe, I went to the blog, Olive and Tomato.  I don't generally recommend many blogs, but this is one I like.  The blogger is Elena Paravantes, a registered dietitian, born in the US, but now residing in Athens, Greece.  Ms. Paravantes blogs on the Greek-Mediterranean diet.   This recipe is adapted from one that I found on her blog.

Tomato Topped Eggplants

Serves 4 to 6.

Ingredients:
2 to 3 eggplants
Extra virgin olive oil
1 small onion, chopped
1 garlic clove, minced
2 cups chopped tomatoes, preferably heirloom
½ cup chopped roasted red pepper
Salt and pepper, to taste
1 teaspoon sugar, optional
4 to 6 ounces Feta cheese, crumbled

Directions:
1.  Slice eggplants crosswise, into ½-inch thick slices (do not peel).  Place eggplants in a colander, salt and allow to sit for about 1 hour.  This will help to reduce the bitterness and collapse plant cells, allowing the eggplant to absorb less oil.

2.  Heat about 1 tablespoon of olive oil in a saute pan over medium heat.  Add onion and cook until  translucent, about 3 to 5 minutes.  Add garlic and cook for about 1 minute.  Add tomatoes, red pepper, salt, pepper, and sugar.  Cook until most of the moisture has evaporated.  Set aside.

3.  Rinse the eggplant slices and squeeze out the water.  Brush eggplant with olive oil.  At the point, the eggplants can be sauteed or grilled.  Set aside.

 
4.  Place eggplants on a baking sheet.  Top with tomato mixture and feta cheese.  Drizzle with additional olive oil.

5.  Bake in a  350°F oven until heated through, about 15 to 20 minutes.

Note:  The tomatoes and eggplants can be cooked in advance and assembled and baked later.


If you want more ways to use eggplants, check out this information from Cooking Light

Thursday, September 6, 2012

What's In My Lunch Box?

School is now into it's third week and I need to break out of my yogurt and granola rut.  Not that I think yogurt and granola are bad, but sometimes you just need something new and different.  So this week, I decided to go outside of my normal lunch.  I decided to try an old favorite, Waldorf salad, with a new twist.  I started with a recipe in one of my favorite cookbooks, Food to Live By and decided to add my own twist to it.  I started by adding rotisserie chicken, so it's off to a headstart already.  I used dried cranberries instead of raisins.

So here is my version of Chicken Waldorf Salad.  Make this and you will not be trading your lunch with little Billy.

Chicken Waldorf Salad

Serves 4.

Ingredients:
cup plain yogurt or sour cream
cup mayonnaise
1 Tablespoon Dijon mustard
½ teaspoon honey
2 cups shredded, cooked chicken (rotisserie or leftover)
1 small apple, chopped
½ cup dried cranberries
½ cup walnuts
½ cup thinly sliced celery
1 bag (3 ounce) spring greens

Directions:
1.  In a small bowl combine yogurt or sour cream, mayonnaise, Dijon mustard, and honey.

2.  In a medium bowl combine chicken, apple, cranberries, walnuts and celery.  Stir to combine.  Add dressing and toss to coat. 

3.  Serve salad on top of spring greens.

Tuesday, August 28, 2012

Lunch Box Safety

Classes started last week and that means two things for me. Firstly, I will be missing my daily dose of The Chew.  Secondly, I've got to pack my lunch.  I could purchase lunch, but that's a little expensive and a few more calories than I need to consume. 

Packing a lunch is an excellent idea for those trying to save money and consume a healthier diet.  However, carrying lunch to work or school may mean it will not be refrigerated.  When you pack a lunch, consider food safety.  It may not be a glamorous topic, but neither is a foodborne illness.

Here are a few tips to help you consume a safe lunch.
  • Purchase an insulated lunch bag.  These bags are better for keeping food safe until it is consumed.  Remember, cold cut sandwiches and yogurt can only be left at room temperature for 2 hours. 
  • Reusable bags should be washed with warm soapy water after each use.
  • Wash hands and any food contact surface before you prepare the lunch.  Also make sure to wash your hands before eating.  If you can't wash your hands before lunch, pack a moist towelette.
  • Freeze a juice box or an ice pack.  This will help keep your lunch cold and by lunchtime, you should be able to drink the juice.
  • If you are packing hot foods, such as soup, use an insulated bottle like a thermos.
  • When in doubt, throw it out.  If all the food is not consumed, toss it.  Better safe than sorry.
For resources on purchasing lunch boxes, check out these sites.
Laptop Lunches
Fit and Fresh

Hope you have a safe and nutritous lunch.  Check in next week when I will be talking about my lunch box favorite.

Monday, August 20, 2012

What I Did This Weekend - Baked!

Okay, so it doesn't surprise you that I baked this past weekend.  It was just one of those weekends.  And I needed to bake, not cook, but bake.  It's just something about baking that seems to release a different set of creative juices. 


I decided to make a plum upside-down cake.  The picture just looked sooooooooo good!  Once I got into baking it, I thought, "this is a version of a pineapple upside down cake".  A chef friend of mine says there are only so many recipes.  I guess she's right.

But whatever it is, this cake is a nice change of pace from the traditional pineapple upside cake.  If you don't want to use plums, apricots or peaches would be a nice substitution.

Plum Upside-Down Cake

Serves 8.

Ingredients:

Plum mixture:
12 Tablespoons (1½ sticks) butter, divided
¾ cup brown sugar, packed
1 Tablespoon honey
4 to 6 large plums

Cake:
1½ cups all purpose flour
2 teaspoons baking powder
½ teaspoon cinnamon
¼ teaspoon salt
¾ cup sugar
2 large eggs
½ teaspoon vanilla extract
¼ teaspoon almond extract
½ cup milk

whipping cream or ice cream, optional

Directions:

1.  Preheat oven to 350°F.
2.  Melt butter in a small saucepan.  Stir in  brown sugar and honey.  Heat until sugar and honey blend in, forming a thick, smooth sauce.  Transfer to a 9-inch round cake pan with 2-inch high sides. 
3.  Cut plums in half; remove pit.  Cut in half into sixths.  Arrange plums on top of sauce in overlapping concentric circles.  Set aside.
4.  Combine flour, baking powder, cinnamon, and salt in a medium bowl.  Using electric mixer, beat remaining 6 tablespoons butter in a medium bowl until light.  Add sugar and beat until creamy.  Add eggs, one at a time.  Beat until light and fluffy.  Beat in extracts.  Add dry ingredients, alternately with the milk, beating until just blended.  Spoon batter evenly over plums.  Bake until golden brown and a toothpick inserted in the center comes out clean, about 1 hour.  Transfer to a cooling rack; cool in pan for 30 minutes.
5.  Using a knife, cut around pan sides to loosen cake.  Insert cake onto serving platter.  Serve warm with whipped cream or ice cream.

Wednesday, August 8, 2012

Clafoutis Anyone?

A few days ago, a colleague and I were discussing recipes for another project that I am working on.  She suggested that I might do a clafouti recipe.  I decided that it might not be a good choice for the other project, but it might be a good blog topic.  After all, it is a French dessert and we (or rather PBS) are celebrating the 100th anniversary of Julia Child's birth.


I must admit that I do not have any fun childhood memories of Julia Child.  My mother and I did not cook her recipes together.  However, with my job of helping people develop food preparation skills, I have come to admire and respect Julia Child.  She had great love of food and inspired Americans to become better cooks.  While Julia may have used her share of butter, she died 2 days before her 92nd birthday and was not overweight.  As Julia used to say, 'all things in moderation, including moderation'.  While I am all for healthy eating, I am also for good eating and I do not not believe these are mutually exclusive terms.  It is with that in mind that I am writing about clafouti and Julia Child.

Clafouti also makes excellent use of summer fruits, such as peaches, plums, and cherries.  I've even seen recipes with raspberries, apples and pears.  I've had my student make it with pears and did not care for it.  It needed a fruit with more intense flavor.  However, if you have nice, flavorful pears, why not give it a try. 

Apparently, the clafouti is a French country dessert from the Loire region of France.  I think of it as fruit baked in a custard. It was originally made with cherries.  I also understand that the pits add extra flavor.  I can't say that I have ever left the pits in.  I'm just not that brave.

I have seen tons of recipes for clafouti, with varying levels of milkfat.  Because I like a soft custard, I decided to use a combination of half and half and whole milk.  To satisfy more of my 'foodie' colleagues, I made half plums and half peaches.  This is my version of clafouti. 

Clafouti

Serves 6 to 8.

Ingredients:
¼ cup, plus 1 Tablespoon sugar
¾ pound fruit, such as peaches, plums or cherries
¾ cup whole milk
¾ cup half and half
¾ cup all purpose flour
3 eggs
¼ teaspoon salt
1 teaspoon vanilla
2 Tablespoon almond liqueur, optional

Directions:
1.  Preheat oven to 350°F.  Butter a pie plate.  Sprinkle with one tablespoon sugar. 
2.  Slice fruit.  Place over sugar in a pleasing design.
3.  In a blender, blend milk, half and half, flour, eggs and salt.  Blend until smooth.  Add the one-fourth cup of sugar, vanilla and almond liqueur.  Pour over fruit.  Bake at 350°F for about 30 minutes or until puffed and golden.
4.  Dust clafouti with powdered sugar and serve at once.

Normally, I would not use liqueur, however since we are celebrating Julia Child, I felt a little alcohol would be appropriate.  If you are celebrating Julia Child, let us know what you are doing.

Tuesday, July 31, 2012

Crostinis, Crostinis, Crostinis!


Up until a couple of years ago I had never heard of crostinis.  And now they are everywhere.  It seems that any and everything is a crostini, such as eggplants, tomatoes, sardines. 

According to The Prentice Hall Dictionary of Culinary Arts, crostini is Italian for 'little toasts' and is used to describe small, thin slices of toasted bread, usually brushed with olive oil.  Who knew!

Sicily was overflowing with crostinis.  And why not?  If you have leftover bread, why not use it to make something edible - think bread pudding.  For centuries clever cooks have turned the 'not so edible' into the 'this is delicious'. 

One crostini that we consumed while in Sicily was made with eggplants and chopped tomatoes.  Both of these plants grow extremely well in the Mediterranean.  And cooks make good use of them. 


Here is my version of Crostinis with Aubergine Tapenade.  I hope you enjoy them.  Some countries refer to eggplants as aubergines.

Crostinis with Aubergine Tapenade

Ingredients:
1 medium eggplant
1 garlic clove, minced
1 teaspoon dried oregano
Salt and pepper, to taste
3 Roma tomatoes
Day old baguette

Directions:
1.  Preheat oven to 350°F.  With a sharp knife, pierce eggplant in several places.  Place on a rimmed baking sheet and bake until soft, about 1 hour. 

2.  Allow eggplant to cool.  Remove the skin and stem.  Cut eggplant into small pieces.  Add garlic, oregano, salt and pepper.  Set aside.

3.  Thinly slice the bread, on the diagonal, into
about ½-inch thick slices.  Brush with olive oil and place on a sheet pan.  Place in the oven at 350°F, until they are crisp, about 15 minutes. 

4.  Dice the tomatoes into small pieces, about ¼ inch.  Combine with eggplant mixture. 

5.  At this point, you can top the bread with the eggplant tapenade or set them out separately and allow your guest to top the bread as they desire.

As to which one I would do, it depends on how much time I have.


Wednesday, July 25, 2012

Eating Potatoes in Sicily

While in Sicily, we had the pleasure of attending the Cucina del Sole Cooking School.  The school is headed up by Eleonora Consoli, a gastronomy journalist. Needless to say, we had a good time.  Put 20+ foodies in the room together (with food, of course) and they have a good time.


It was really a lot of fun learning about Sicilian cuisine.  It's always fun to expand your cooking repertoire.  I came back with a few good recipes that could easily find their way into my own cooking. 

One of the first dishes we made in Sicily was a potato and pistachio casserole.  As it turns out, Sicily grows pistachios.  So they make good use of them in their cuisine.  Most pistachios are grown around the Mount Etna and Bronte areas.  Most pistachios grown in Sicily are consumed in Sicily.  Very little is exported.  Although widely viewed as a snack food, pistachios are well-suited for many recipes requiring nuts.  The next time you have a recipe calling for pine nuts, give pistachios a try and see how you like them.

Potato and Pistachio Casserole

Serves 4.

Ingredients:
1½ pounds baking potatoes, such as Russet or Yukon Gold
2/3 cup grated Parmesan cheese
2 Tablespoons butter, plus additonal for coating the dish
Pinch of nutmeg
Salt and pepper, to taste
2 large eggs
½ cup pistachios, finely chopped, divided

Directions:
1.  Peel  and coarsely chop the potatoes.  Place in a medium saucepan and cover with water.  Cook until potatoes can be easily pierced with a fork.  Drain.  Place on heat to dry potatoes.  There should be a film on the bottom of the pan. 

2.  Mash potatoes.  Add cheese and butter, nutmeg, salt, and pepper.  Stir to combine.  Add eggs once potatoes are cool enough.

3.  Coat a casserole dish with butter.  Add pistachios and coat the dish.  Pour out extra pistachios and reserve for topping.

4.  Place potato mixture in casserole. Top with pistachios.  Bake at 350°F for about 30 to 40 minutes.

According to Ms. Consoli, one can put other ingredients in the middle of this casserole. Some of her suggestions were artichokes, spinach, asparagus, eggplant, zucchini, cheese, mushrooms, and hard boiled eggs.  For my version, I added grated zucchini in the middle of the casserole.


Tuesday, July 17, 2012

Simplicity

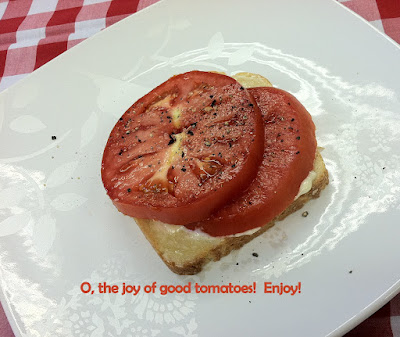
Oftentimes, I struggle to get my students to understand that there is nothing wrong with simplicity.  Simplicity can be a beautiful thing.  That is no more true than with fresh summer produce.  Good, fresh food needs little adornment. Sometimes all you need to do is wash, cut and eat.  To borrow a phrase from Ina Garten, "How easy is that".

When I think of simplicity and summer foods, I think of a tomato sandwich.  Yes, a tomato sandwich.  This must be a Southern thing, because my Midwestern friends look at me like I'm nuts.  If the idea of a tomato sandwich seems a little odd to you, think of it as a BLT without the B and the L.

Here is how you get started with a tomato sandwich.  First of all, you need good quality bread. You need a sturdy bread to soak up all those tomato juices.  I used challah.  You also need good tomatoes.  This is when you get out of bed in time to hit your local farmers market or your garden.  I like mayonnaise on mine, maybe with the addition of garlic.  If you really want to get fancy, top it with a little of your favorite cheese, such as Parmesan, sharp cheddar, or a fresh goat cheese.  You can also add chopped basil, capers or a drizzle of balsamic vinegar.  Those additions sound really great.  But I am going to stick with my simple version.


Tuesday, July 10, 2012

Food from Sicily

Recently, I told you that I would share some recipes from Sicily with you.  Here is the first of those recipes - Panelle or chickpea fritters.  Before traveling to Sicily, I had never heard of panelle or chickpea fritters.  We had them on at three different occasions over the course of 14 days.  They were served mostly as an appetizer or snack.

Since returning to the states, I have learned that panelle is served as a sandwich, Pane e Panelle.  It is especially popular in Palermo, Sicily.  My understanding is that panelle is found in Sicily due toArab influence.  The Arabs ruled Sicily at one time.

Basically, panelle is chickpea flour, water, salt and sometimes, herbs such as parsley.  This mixture is cooked to hydrate the beans.  It is then spread onto a flat surface, allowed to cool and cut into serving size pieces.

Here is my version of panelle.

Panelle (Chickpea Fritters)

Serves 4.

Ingredients:
1¼ cups chickpea flour
3 cups water
1 teaspoon salt
¼ cup chopped parsley

Directions:
1.  Combine chickpea flour, water, and salt.  Cook over medium heat, stirring constantly.  Add parsley when mixture begins to thicken.  When mixture has absorbed all the water and is pulling away from the side of pan, quickly spread onto a jelly roll pan or cookie  sheet.  Cover with plastic and allow to cool.

2.  Preheat oil to 375°F.  Cut panelle into 1 X 2-inch strips.  Drop several into oil and fry until golden brown.  Drain on a paper towel lined cooling rack.  Serve immediately.

Note:  The chickpea flour mixture can be cooked through the first step and refrigerated for one day.

Monday, July 2, 2012

Bacon and Farmers Market


I have not made it to my local farmer's market this year.  Normally, I am regular by this time.  Before you feel too sorry for me, I missed several opportunities to go to the market due to a trip to Sicily.  Ok, your sympathy for me has hit a new low!


Although Sicily was a lot of fun, I really did miss my local farmer's market.  No matter how many farmer's markets I visit, nothing beats my farmer's market.  So what's so special about my farmer's market?  For everyone else, probably nothing.  For me, it's just a special place. 


Since I have not traveled to the market this year, I have been dreaming about what I could make with my first purchase at the market.    I found a recipe for Warm Bacon Vinaigrette in the April issue of Cooking Light.  I thought it would be a perfect dressing for fresh farmer's market vegetables.  I made the vinaigrette and used it on potatoes and greens beans.  They were pretty good, even if I must say so myself.


Thursday, June 28, 2012

Celebrating All the Colors of America


Every year around July4th, a slew of red, white and blue recipes appear on numerous websites.  You can find recipes for red, white and blue jello, cakes, and just about every other dessert. 

When I think of America, yes, I think of red, white and blue.  I also think of all the other colors of this country.  We are a nation of immigrants, coming to this country in search of our own American dream.  Some came by choice, while others came by force.  But be that as it may, we are all Americans.  So this July 4th, let's embrace all that we are.

In honor of July 4th, I am posting a blog by one of my students, Adrijana Pusnik, a new immigrant from Croatia.  So here is the blog, in Adrijana's own words.


Being from the Balkans and now residing in the Midwest, I have to share my Balkan cuisine with my American friends.  None is more popular back home than ćevapi (or chevapi).  These are mini finger like sausages that are grilled and served on pita bread with onions and other condiments.

The origin of ćevapi has many different variations, but the story that I am familiar with goes that this recipe was founded on the Ottoman Empire expansion into the Balkans where the Slavs, who lived there, had to obey the Ottomans or they would be killed.  One of these ways to obey was to adapt to their cuisine, such as the kebab or a larger version of ćevapi consisting of a larger grilled sausage served on pita bread.

There are a few things I like about the recipe, such as it is a reasonable portion size and perfect for social gatherings.  As well as, it doesn't take long to make and there is flexibility with ingredients being added to create one's own version of ćevapi.  The total cooking time is about 30 minutes, usually about 10 minutes to prepare the mixture and about 20 minutes to grill. 

Ćevapi (or Chevapi)


Serves 4.

Ingredients:


1 pound ground beef, pork and/or lamb
1 egg white
1 to 4 garlic cloves or ¼ cup chopped onion
1 teaspoon salt
1 teaspoon baking soda, to tenderize the meat
1 to 2 teaspoons ground black pepper
1 teaspoon cayenne pepper
½ teaspoon paprika


Directions:

1.  Preheat a grill for medium-low heat.

2.  In a large bowl, combine the meat and egg white.  Add garlic or onion, salt, baking soda, black pepper, cayenne pepper and paprika.  Mix well.  Form into finger length sausages, about ¾ inch thick. 

3.  Lightly oil the grilling surface.  Grill sausages until cooked through, turning as needed, about 10 minutes for each sausage.

4.  Ćevapi are usually served on pita bread with condiments of one's choice, such as grilled onions and ajvar.


Tuesday, June 12, 2012

Eating Sicily

Sorry about not posting recently, but I was eating my way around Sicily.  We arrived in Catania, Sicily on May 20th and departed on June 2nd.  We had a wonderful trip.  To all the Sicilians who shared their culture with us, thanks.  I hope when you to travel to the US, we will show you the same hospitality. 

Over the summer, I will be sharing some of my favorite Sicilian recipes on this blog.  I had some very good and memorable foods. 


I must say Sicily had the most beautiful and biggest garlic bulbs I have ever seen.  If only I could have brought a few back to the states.


Eggplants, well, I think Sicilians have mastered using eggplants.  We saw variety after variety of eggplants.  We had eggplant lasagna, eggplant roll-ups, ricotta cheese sandwiched between eggplant slices.


Veal Involtini - essentially this is meat rolled around breadcrumbs and either fried, baked or grilled.  These were very thin slices of veal.  This dish makes good use of breadcrumbs and a small amount of meat.


And, finally dessert.  Most desserts tended to be lighter and refreshing. 

If you've got a favorite Mediterranean recipe, let us know.  But check back over the summer and see what is happening as a result of my trip. 

Tuesday, May 22, 2012

Oh, the Joys of Jell-o

Back in the dark ages, when I first started cooking, I purchased The New Joys of Jell-o Cookbook.  Think I paid a dollar for it.  Making jell-o, for whatever reason, fascinated me.  There was just something about sucking jell-o through my teeth.  Come on, admit it, you did it too.

My mother made jell-o on Sundays.  Why?  I don't know.  Maybe, jell-o was just that special.  It seems that most of my students purchase jell-o already made.  I'm sorry, but some things I just need to make myself.  Jell-o is easy to make, hot water, cold water and a package of jell-o.  However, you do need to plan ahead.  It's got to chill in the refrigerator.

Jell-o or gelatin is actually an animal protein, made from collagen.  Have you ever noticed that meat drippings become jelly-like when cooled?  Well, that's jell-o or as it is scientifically called, gelatin. Since it is low in the essential amino acid, tryptophan, it is an incomplete protein.  When jell-o cools, it actually forms a protein gel.  Although we think of jell-o for desserts only, gelatin is used frequently in the manufacture of food, such as, marshmallows, yogurt, ice cream and cream cheese. 

In it's early history, jell-o was made the well-to-do.  Because to make jell-o, you needed a refrigerator or icebox.  To purchase a refrigerator or icebox, you needed to have money.  Thus, jell-o was made by those with money. 


Now that jell-o (and refrigerators) are available to the masses, why not make a simple dessert of jell-o.  With a little planning, your dessert will be ready when you are.

Monday, May 14, 2012

Discovering Yogurt

I remember when I first tried yogurt.  My college roommate introduced me to it.  Until then, I had never seen nor heard of yogurt.  In the late 70's and early 80's yogurt was still a relatively new thing in the United States.  There were only a few companies that made yogurt and it was mostly flavored and contained added sugar. 

Fast forward to the 21st century and I am still eating yogurt.  I no longer consume much of the fruit flavored sweetened types.   I now purchase plain yogurt.  Before all of you true yogurt consumers get too happy, I do add stuff to plain yogurt.  I prefer homemade jam or honey, granola and maybe fresh fruit.  I saw a colleague do this and thought nothing about it.  Later another colleague told me about adding stuff to plain yogurt and I turned up my nose.  Her comment, "Don't knock it, 'til you've tried it".  Being the foodie that I am, I could not resist the invitation.  I tried it and was hooked.  The flavored sweetened varieties are good, but I now prefer plain yogurt with my additions.


There is a lot of scientific evidence supporting the consumption of yogurt and other fermented dairy products. 

Most yogurts provide the body with 'good', 'beneficial' or 'friendly' bacteria.  Research shows that 'good' bacteria may help with lactose intolerance, constipation, diarrhea, and colon cancer.  You may hear the term "probiotic" when referring to yogurt.  Yogurts that contain probiotics will have the statement, "live and active cultures" on the label.  The benefits of probiotics are specific to certain strains of bacteria. Most yogurts will also state which specific bacteria were used, such as, Streptococcus thermophilus and Lactobacillus bulgaricus

In order for bacteria to have probiotic benefits, they must survive the digestive system and colonize in the intestines.  Under normal conditions, good bacteria outnumber the bad, making the intestinal tract less hospitable for harmful bacteria.  In addition to its probiotic benefits, yogurts are made with dairy products and are a good source of protein, calcium, vitamins B2 and B12, potassium, and magnesium.

Yogurt - My Way

Serves 1.

6 to 8 ounces plain yogurt
Jam, 1 to 2 tablespoons or honey
Granola, about 1/4 cup.

Combine and enjoy for a healthy, breakfast, lunch or snack.

Tuesday, May 1, 2012

Reese's Tater Tot Casserole

For a long time, no one seemed to cook.  I knew people who even bragged about how they could not cook.  We were proud of our inability to prepare a few simple dishes.  Then along came Martha Stewart and Food Network.  And all of a sudden, cooking was back in vogue.  Thank God! 

Somewhere along the way we seem to have forgotten about the shear joy of sharing a meal with people we care about.  A lifetime of memories are made in the kitchen and at the table.  Sharing a meal is often where we learn the art of conversation and manners.  It is where we pass on values and traditions. 

Cooking may seem frivolous in a time-crunched society, but cooking stimulates creativity.  The late Julia Child believed that food is more than sustenance and children must be taught that cooking is akin to art.  Cooking is as creative as music, drawing.  Cooking helps children learn to love food - children should experience food hands on.  Research shows that hands-on cooking is a great way to improve mealtime practices and eating habits of children.  They need to taste, to touch, smell and listen to food. 

But enough with all the soft, feel good and scientific stuff, cooking and eating are just plain fun. 

Tater Tot Casserole is a favorite of a colleague's daughter.  Her favorite thing about this casserole is lining up the tater tots exactly the same.  Her mother says that even though the recipe states to dump it all together, it actually cooks better when the tater tots are "lined up". 

Tater Tot Casserole

Serves 8 to 10.

Ingredients:

1 package (32 ounce) tater tots, thawed
2 cups (8 ounces) American or Cheddar cheese, shredded
1 can (10¾ ounce) condensed cream of chicken soup
1 cup sour cream
½ cup onion, finely chopped
¼ cup butter, melted
½ teaspoon black pepper
1 cup corn flakes, crushed
1 Tablespoon butter, melted
Cooking spray

Directions:

1.  Coat a 9 X 13-baking dish with cooking spray.  Place tater tots in baking dish; set aside. 
2.  In a large mixing bowl, combine cheese soup, sour cream, onion, butter, and pepper.  Pour over tater tots.  (If desired, casserole can be assembled up to this point and refrigerated.)
3.  Toss together cornflakes and one tablespoon of butter.  Sprinkle over casserole.  Bake in a 350F oven for about 1 hour or until casserole is golden brown.

To make this dish a little healthier, use reduced fat cheese and sour cream.